How To Change The Print Type In Word For Mac
Posted By admin On 24.02.19Insert your photo into Microsoft Word ('Insert' then 'Picture' and find the file). Step Right-click the image and choose 'Format Picture' or 'Text Wrapping' (may differ depending on your version of Word). Selecting Basic Print Settings - Mac OS X 10.5/10.6/10.7. Select the basic settings for the document or photo you want to print. Open a photo or document for printing. Select the print command in your application. Select the type of paper you loaded as the Media Type setting.
I’ve tried everything I could think of–adding a space before/after my words, disabling all of my autocorrect functions, restarting my computer, checking to see if it would show up in print preview, and even trying a different computerbut to no avail. Can you think of anything else I should try? I would appreciate your input! A few things. #1 — Your font color on this page is so light grey it hurts. A little more contrast would go a long way. #2 — Just seeing a month marker (and no year) almost made me immediately leave the page as it is infuriating to search data that may be 10 years or older, and thus irrelevant in terms of upgrades with computers.
• On the Word menu, click Preferences. • Under Output and Sharing, click Print. • Under Printing options, select the Reverse print order check box. Change the page orientation for a document • On the View menu, click Print Layout. • On the Layout tab, under Page Setup, click Orientation, and then click Portrait or Landscape. • On the File menu, click Print. Change the orientation for specific pages • On the View menu, click Print Layout.
How To Change The Print Type In Word For Mac Free
Open the Print dialog box. Select Layout from the drop-down list. Select the number of pages you want to print on one sheet of paper from the drop-down list. Click Print to start printing. Note: The Layout settings are a standard feature of Mac OS X. Duplex printing Duplex printing prints on both sides of the paper. You can do duplex printing manually.
Customizing print settings Your printer provides for customized print settings if you need more control over the printout, want to make the most detailed settings available, or just want to experiment. Follow the steps below to customize your print settings. Open the Basic Settings dialog box. Click Advanced, then click More Settings.
Andrew Mitchell wrote: However, if I print the exact same photo using Photo Quality Glossy Paper, I get awful results, very much darker skin tones and colors generally. One thought is that perhaps you need to make sure you have the correct paper type selected - if I go to 'Print', then on the lower third dropdown change 'Copies And Pages' to 'Print Settings', there is a 'Media Type' dropdown that appears, which I can change to Glossy (which looks much better as I accidentally printed my first few images on glossy paper without changing this and they looked terrible). Make sure you have the proper printer selected first.
You should have a whole selection of options including curving text up or down, and making circles. 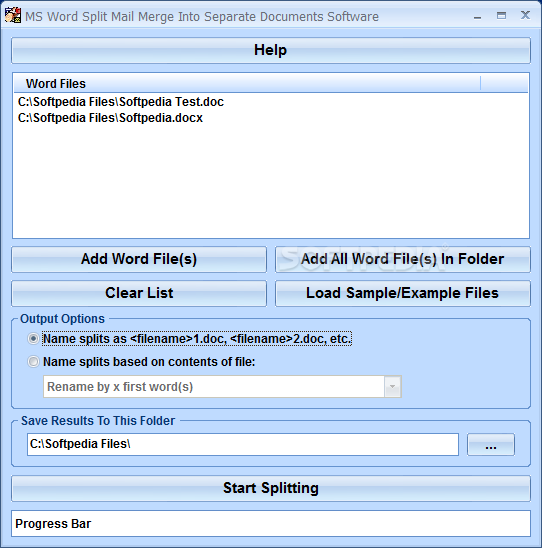 You can edit the curvature by pulling on the text box handles, up and down, and on the corners. You can rotate the text box by clicking and holding on the long 'knob' on the text box.
• To use 'click and type' (discussed later in this chapter), you must switch to Page Layout, Online Layout, or Notebook Layout view. Using the navigation pane Introduced in Office 2004, you can use the navigation pane to quickly move to any page or heading in the current document.
When you print two pages per sheet (also called 2-up) on a letter-size piece of paper, the text obviously needs to be shrunk. However, the proportions are different. So if you design two 8.5x11 pages, and print them 2-up, the half-piece is proportionally taller than the full-size piece, meaning you get extra blank margin at the top and bottom of the half-piece. To solve this issue, I used a custom page size of 5.5x8.5, instead of simply shrinking an 8.5x11 document. 
How To Change The Print Type In Word For Mac
We can also choose a new color scheme by clicking the Color button on the far right side of the Document Formatting group and choosing a new one: Let's choose Yellow Orange. Applying a Document Theme So far, we've talked about modifying or changing a template's theme. However, you can also apply a theme to your documents that you create. Before we learn how to do that, it's important to understand exactly what a theme is, so you know how it applies to your text. A theme consists of three things: Colors (of graphics and design elements, background color, text color, and hyperlinks), fonts (headings and body text), and graphical effects such as 3-D, shading, drop shadows, etc. Latex for mac. Modify or Create a Theme If you want to create a custom color theme (or a color scheme that you create instead of the ones Word has built in under the Color button), click the Color button under the Design tab, then select Customize Colors. Choose the colors for the various elements, then enter a name for your new color theme. Click Save when you're finished. This new theme will now appear with the other themes. To create a custom font theme, click the Fonts button under the Design tab and choose Customize Fonts.